Panasonic Leica DG 200mm f/2.8 lens vs Canon EF 135mm f/2.0L lens and Canon 1.4x TC on Micro Four Thirds

Written by Gary on June 28th, 2018

The Panasonic Leica DG 200mm f/2.8 lens for Micro Four Thirds is now readily available, and very expensive ($US2999 with the bundled 1.4x TC which was NOT used in these tests), so, after having ran some tests with other Micro Four Thirds and Four Thirds lens options in a previous post, I decided to test it against the flagship Canon prime lens – the Canon EF 135mm f/2.0L lens with and without the Canon 1.4x teleconverter – mounted on the same Olympus OM-D E-M1 Mark II Micro Four Thirds camera to ensure there were no differences in sensors, and I used a bounce flash with no direct light onto the lens to remove issues of camera shake, image stabilisation etc. Both lenses were used without any filters and with their long lens hoods. The Canon lens was mounted via a Metabones adapter and as this does not allow AF with this particular Canon lens, I used careful, magnified view manual focus.

In each case, the actual AF target chart was the focus point to ensure their were no flatness of field issues.

I performed the exact same image processing in Lightroom – import RAW file, cropped to the top right corner lens testing chart, and exported as jpeg without any further resizing but with LR’s default sharpen for screen applied.

Note: the links on my posts take you to more information on my wikipedia, not to online retailers!

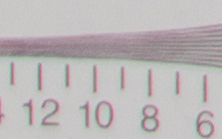
at effective f/2.8 center corner
Panasonic 200mm f/2.8 comparison comparison
Canon EF 135mm f/2.0L lens with Canon 1.4x TC to give 189mm f/2.8 comparison comparison
Canon EF 135mm f/2.0L lens shot at f/2.8 but moved closer to chart to give similar magnification, better resolution than with the TC on, but still very soft contrast! comparison comparison

With the Canon lens with TC, I did try to achieve similar magnification but the size for the corner shot indicates I was a touch too close, nevertheless this should have given a resolution advantage to the Canon combo but obviously the combo was no where near a match for the Panasonic lens!

The Canon EF 135mm f/2.0L lens is renown for its internal lens flaring when direct light hits the front element, and this can be used to effect to soften portrait images without having to apply Vaseline to a front filter, but in this test I took great care to avoid this in this testing, and yet the micro-contrast is very poor in comparison with the amazingly superb results of the Panasonic lens which is much more expensive, but is also better weather-sealed, has optical image stabilisation, focus range limiter, much faster and more accurate autofocus system (compatible with CDAF cameras and face recognition eye detection AF), and a Lens Function button.

The optical deficiencies of the Canon 135mm f/2L lens is one of the reasons I moved from full frame Canon gear to Micro Four Thirds as the superb Olympus micro ZD 75mm f/1.8 lens provided far better microcontrast and faster, more accurate autofocus, especially for portraits, as well as gaining 5 stops of in-camera image stabilisation which is incredibly useful when you need lower shutter speeds for fill in flash in full sunlight.

That said, the Canon 135mm f/2L lens is still a useful lens, and when you need that extra shallow depth of field on a full frame camera, it can be useful, and of course, if you want that soft low contrast look then this lens gives it to you in spades, plus, it can be useful for deep sky astrophotography such as comet photography with a guided equatorial mount.

Panasonic 200mm lens bokeh examples straight out of camera:

bokeh

bokeh

bokeh

And even after the end of a bushwalk in cold conditions, the image stabilisation is so good that this image without a lot of care, was shot at 1/8th sec hand held – that is incredible for a 400mm effective field of view lens:

bokeh

and here is a quick “close up” image of some dew to show the bokeh at closest focus (this one has had a matte colour grading applied):

bokeh


How to use your Olympus OM-D E-M1 Mark II to measure distances

Written by Gary on May 15th, 2018

Using your camera to measure distances can be very useful, even if you are not a golfer.

You could focus on a subject and read off the focus distance on the lens but this is very imprecise.

Another useless method would be to just measure how wide your camera is and then mark out how many cameras it is to your subject, but this requires a calculator and is time consuming and very impractical, and often impossible.

An alternative AFTER you have taken the shot and got the image on the computer is to drop the file onto exiftool(-k).exe and this will display a lot of EXIF information in the image file including the recorded focus distance. You can download this free and excellent EXIFTool file from Phil Harvey’s website.

BUT, the E-M1 Mark II has unique magic – measure BEFORE you shoot!

The Olympus OM-D E-M1 Mark II Micro Four Thirds camera is the first, and still, the ONLY camera that I am aware of which has two unique, in-camera, brilliant focus functions:

  • Preset Manual Focus distance (most pro cameras only have this function available on some lenses and although these lenses can set a focus point it won’t give you a read out of the precise distance set), and,
  • in camera AF focus limiter (other cameras only have this available on some lenses and even then you only have 1 or 2 options which are mainly designed to speed up AF but do not give you enough flexibility to ignore foregrounds or backgrounds)

To measure a distance:

In the Super Control Panel, go to the focus mode section and select Preset MF, then press the INFO button.

Now when you lock AF on a subject (eg. half-press shutter button as per usual) it will display the estimated distance to 0.1m precision which seems accurate on my brief testing.

You then can use these values to set the in-camera near and far AF focus limiter range which is an amazingly good function which allows the AF system to ignore anything closer (eg. foreground subjects, dirty windows, wire fences, etc) and ignore anything more distant (eg. the crowd in the background). This function could save you a LOT of frustration and also potentially avoid out of focus images – just don’t forget to turn it off when it is no longer needed.

Use the AF Limiter to make AF on stars MUCH easier:

AF on fainter stars can be a frustrating experience as the lens runs through the full range of focus distances trying to find maximum contrast.

You can address this issue superbly by setting the in-camera AF Limiter to something like 900m close limit and 999.9m further most limit (this essentially is treated as infinity by the camera).

Makes astrophotography sooo much easier!


Training your eye for photography and experience the present

Written by Gary on May 13th, 2018

Photography not only requires a firm understanding of how to use your camera and an understanding of visual aesthetics and rules of composition and how light sources play with your subject, but a photographer often benefits from time and patience to see what others do not see – if they are prepared to take time out and take in the ambience to its fullest.

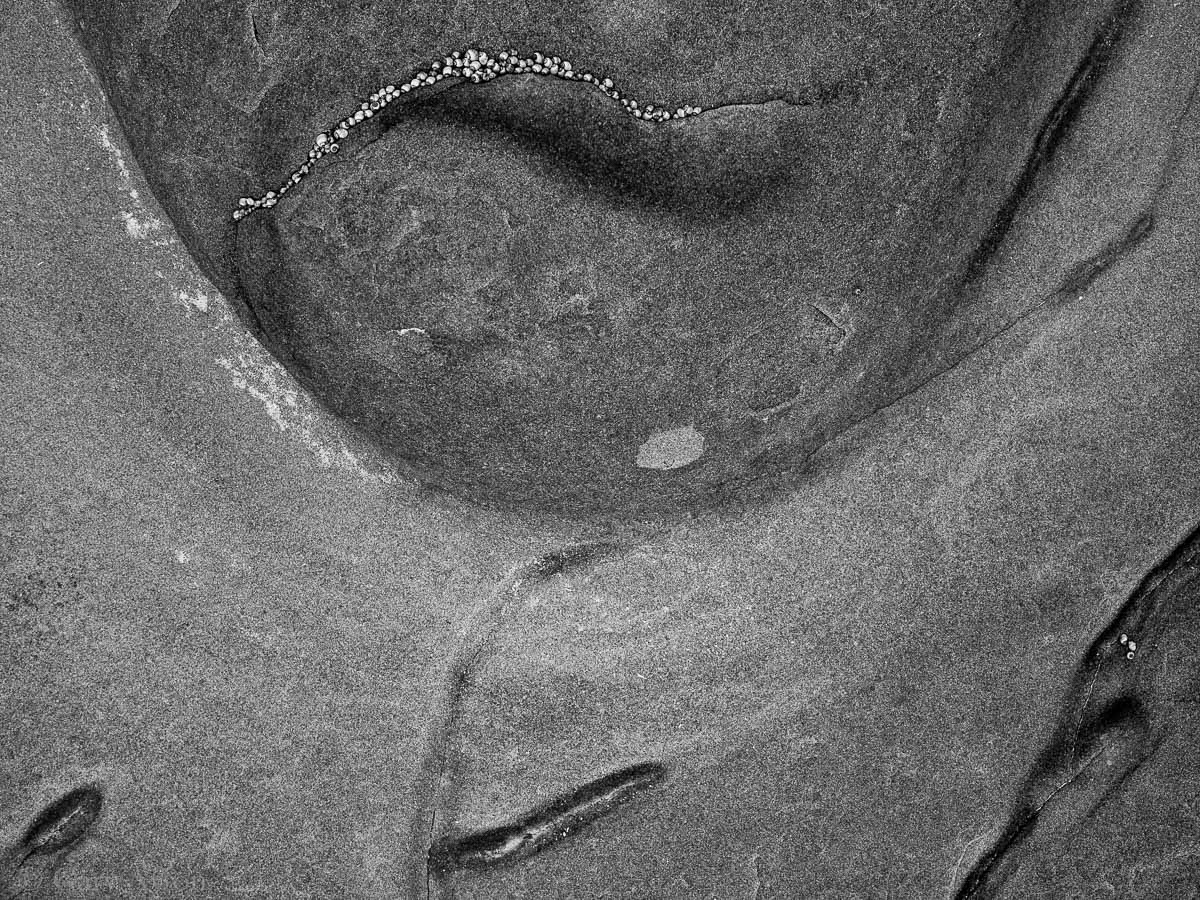
So here are a couple of variations of the same bit of eroded coastal sandstone and shells which no-one else noticed as they walked along the coast – but if you don’t know what to look for or don’t take the time, you will never see….

These were taken with the Olympus OM-D E-M1 Micro Four Thirds camera with Olympus micro ZD 12-40mm f/2.8 PRO lens :

sandstone and shells

Perhaps a man drooling?

But then look closer and re-visualise it by re-orientating your eye and you get this beautiful simple, relaxing composition:

sandstone and shells

To me the greatest gift that photography has given me is to learn to see the world differently, to look for beauty in everyone and everything, to see what others cannot see – it is not really about the end photo, it is not about a journey’s end – it is about living life.

It is a form of mindfulness to restore our stressed brains, and really take in the ambience, smell the salt in the air, feel the breeze, see the light in all its glory, and then to look around and see unseen beauty which helps to rejuvenate all those traumatized brain cells.


Walking in the steps of dinosaurs

Written by Gary on May 12th, 2018

There are not many locations in Australia where dinosaur fossils are to be found, but the south Gippsland coast has a spot where the university teams come each summer to recover what the Winter’s waves have uncovered.

Sorry, unfortunately I didn’t go digging for fossils, I left that to the pros!

While exploring the coast for my Milky Way shot, I enjoyed being able to walk along the lovely eroded sandstone formations and try to find patterns which sparked with my visual cortex.

These were taken with the Olympus OM-D E-M1 Micro Four Thirds camera with Olympus micro ZD 12-40mm f/2.8 PRO lens (yes, this kit is so weathersealed, I can wash off all the salt spray when I am finished):

So see if you think along the same wavelength as me, or perhaps you may have a totally different take on them:

sandstone and shells

The loner.

sandstone and shells

Ancient Hebrew writing or perhaps it is our Gold Coast theme park – Dreamworld.

sandstone and shells

Pie in the face?

sandstone and shells

Teenage pregnancy?

sandstone and shells

Smiling dog skull?

sandstone and shells

Sunbather massaging suntan lotion onto his partner’s back … or an anteater riding a horse, jumping over a snake?

sandstone and shells

And this one is just colors and textures.


Olympus 8mm f/1.8 fisheye lens does the Milky Way, Jupiter, Mars and Saturn

Written by Gary on May 12th, 2018

Last month I had the opportunity to head down top the coast and find a nice spot to shoot the Milky Way with Jupiter, Mars and Saturn nicely lined up with it.

It was not an easy shot to achieve – after initial planning during daylight hours to find the right location which was under the ocean at high tide, I had to wait until low tide coincided with the rising Milky Way, then walk about 500m amongst the rock pools in the dark.

My first attempt at 10pm I had to abort due to clouds coming over and I thought the last chance for the month was going to be gone.

At 1.30am though the clouds had cleared and although the tide was now rising and there was increased risk of rogue waves washing me off the rock platform, I decided to get back in the car and drive to the location and try it out.

I used the Olympus OM-D E-M1 Mark II Micro Four Thirds camera matched with the lovely Olympus micro ZD 8mm f/1.8 fisheye lens which is a nice lens for Milky Way shots as it renders stars well, as a very wide field of view which means one can use longer exposures without obvious star trailing, and the f/1.8 aperture means one can shoot comfortably at ISO 1600-3200. The ultra wide field of view avoids the painstaking task of shooting a dozen different shots and stitching them together.

I lit the foreground structures with my LED Lenser head torch on its low spot setting.

Here is my single shot image which has had some LR post-processing – 8mm f/1.8 fisheye at f/1.8, 15 secs, ISO 3200:

Milky Way

Note that the top left bright “star” is Jupiter, the top right constellations are Crux (Southern Cross) and the Pointers of Centaurus. The two bright “stars” below the Milky Way core are Saturn, and the brighter Mars. The bright orange star near Jupiter is Antares, the brightest star of Scorpio. I love that the rock formation to the right looks a bit like the map of Australia. The green to bottom left is some light pollution of a nearby town where I was staying and residual sea fog / cloud – perhaps I left Netflix on with Stranger Things running!

I was also keen to see how the new Olympus Viewer defishing function would work with star shapes (I could have used the new in-camera defishing function but I wanted to work with RAW files not jpegs) – unfortunately at the ultra wide setting – the edge stars were severely stretched – this may need a bit more experimentation to mitigate, but at least we get a straight horizon – for me though I would prefer nice star shapes and a curved horizon.

Milky Way defished

I have posted previous blogs of Milky Way shots taken with the Olympus 8mm f/1.8 fisheye lens:


Panasonic Leica DG 200mm f/2.8 – how good is it really on an Olympus OM-D E-M1 Mark II and how does it compare to other options?

Written by Gary on May 10th, 2018

In my previous post, I outlined the super telephoto lens options for Micro Four Thirds (only those with autofocus).

I have now had an opportunity to play with the newly released and very expensive Panasonic Leica DG 200mm f/2.8 with its supplied 1.4x matched teleconverter to see how well it plays with the Olympus OM-D E-M Mark II (with the latest firmware update which addressed C-AF issues with this lens).

This combination is perhaps the most compact, high image quality, wide aperture super telephoto kit you can buy – and in addition, you can also shoot at an insane 18fps RAW with continuous AF with silent electronic shutter and is weathersealed making it perfect for inclement weather conditions.

In full frame camera terms, this combination gives you the telephoto reach of 400mm f/2.8 image stabilised, or 560mm f/4 image stabilised when used with the teleconverter in a very compact, easily hand holdable, walkaround kit (although in Micro Four Thirds terms this lens is not that light but far lighter than full frame options.

At 1.25kg, it is about the heaviest lens I would hand hold comfortably for any extended length of time on a camera, and the heaviest lens that is comfortably carried with a waist belt system, and it might even allow you to get your gear under the flight cabin luggage limits. It balances nicely with the E-M1 when hanging down and holding camera only with the grip, but as would be expected, it does become a bit front heavy when in shooting position.

How well does it work on the Olympus E-M1 Mark II?

Some great news here – in a word – fantastic!

AF is very fast and silent, seems to work very well in C-AF for kids running towards the camera at soccer games, even when using low burst electronic shutter mode at 18fps!

Eye detect AF works as for other lenses.

ProCapture is enabled thanks to the latest firmware upgrades of the E-M1 Mark II.

Although Sync IS / Dual IS is NOT supported, the OIS only option allows sharp hand held shots down to 1/15th second with care (1/50th with TC on), while the E-M1’s superb IBIS alone will get you handheld acceptably sharp shots down to around 1/8th – 1/5th second!

Theoretically, at this focal length, OIS may have advantage over IBIS as it can offer larger corrections as the sensor can only move so far and for telephoto lenses, the optically element has a wider range of shake correction, so I guess a lot depends on how you are holding it. There does not aoppear to be a way to set the lens OIS to panning mode (Panasonic cameras have a menu option for this but Olympus do not as the Olympus IS is now “auto-sensing”). Users of the Panasonic 100-400mm lens on the E-M1 for birds in flight (BIF) have commented that there are issues with OIS in that lens during panning and that they resort to IBIS to avoid those problems, or to turn IS off altogether given you will be using a fast shutter speed of around 1/2000th sec anyway – this may also hold true for the Panasonic 200mm lens .

The OIS functionality requires a menu setting – if you want the lens optical IS to be the one working, you need to set the E-M1’s menu option, cogwheel, C2, Lens I.S. Priority to ON as well as the lens Power OIS to ON (if this is OFF and you have the E-M1 IBIS set to IBIS-Auto, the camera’s IBIS will be working instead).

The lens focus memory button works as does the focus limiter switch – but you also have the option of the E-M1 setting a more limiting focus range in camera and also an in-camera preset focus – no other camera I am aware of allows this fantastic functionality for sports.

The Lens Function button works as with Olympus lenses – just assign a function to it from the camera menu – default is AF-ON which halts AF while you have it depressed – this is great for C-AF when something moves in front of your subject, or you wish to transiently lock focus and recompose.

For most sports however, the IS is not as important as the wide aperture as you will probably be wanting to shoot at least as fast as 1/500th second, and here, the f/2.8 or f/4 with teleconverter allows you to keep ISO down to usable levels around ISO 1600-3200.

The automatic focus stacking function is not currently possible with this lens, and, as with all Olympus MFT cameras, they ignore the aperture ring functionality which some Panasonic lenses have.

The images in this post (other than the side-by-side lens comparisons which were taken using the Olympus 45mm f/1.2 lens) have not been post-processed other than resizing for the web, and the moon and sharpness images are the only ones which have also been cropped

crop of handheld moon with TC on

Crop of moon rising behind clouds, handheld with TC and OIS on, 280mm f/4, ISO 200, 1/100th second.

book at 1/8th sec IBIS

Sitting on my couch playing with the lens at night in low light – 200mm f/2.8 hand held using E-M1’s IBIS at ISO 800 and 1/8th second shutter – now 400mm equivalent at 1/8th second hand held is rather incredible – but this performance is what we have come to expect from Olympus cameras!!!

book at 1/60th sec OIS

Sitting on my couch playing with the lens at night in low light and a bit closer to the books – 200mm f/2.8 hand held using Power OIS at ISO 3200 (no post-processing NR and camera set to LOW Noise Filter) and 1/60th second shutter

Let’s compare it without the teleconverter to other 200mm options:

Firstly, the Olympus micro ZD 40-150mm f/2.8 lens with its 1.4x teleconverter:

I have grown to absolutely love the Olympus 40-150mm lens as it is so versatile, so weathersealed, has a lovely long lens hood to protect the front elements from the rain and provides great image quality and the f/2.8 aperture combined with IBIS allows low light imagery at low ISO.

I am not such a big fan of the matched Olympus 1.4x teleconverter as you do lose a bit of sharpness as well as the inevitable loss of 1 stop of light that all 1.4x teleconverters cause, thus this lens becomes a 56-210mm f/4 lens.

Let’s see how well it matches up with the far more expensive and heavier Panasonic 200mm f/2.8.

comparison

As you can see, they are both practically the same length, but the Panasonic is much heavier and has a wider diameter.

The 880g Olympus lens gives the advantage of being able to zoom out to 56mm, and has a lovely lens hood which collapses back over the lens although this design can be problematic as it is easily damaged and does make the lens more bulky, plus you can totally remove the tripod mount as I have done to reduce the weight and bulk even further, and the manual focus clutch is really handy at times. It can also focus much closer, to 0.7m, giving almost twice the close up performance. Uses a 72mm filter instead of the larger 77mm filter.

The much heavier 1.25kg Panasonic 200mm f/2.8 has the option of Power OIS, and the additional lens functions – although none of these are really needed when used with the E-M1 Mark II. It’s lens hood is also nice and large, but it slips on and you must tighten it up – I will have to see how this works for me – I hate the design on my Olympus 75mm f/1.8 lens as it keeps falling off, but time will tell how this one works as it does have a different mechanism again.

The Olympus ZD 50-200mm f/2.8-3.5 lens:

The Olympus 50-200mm lens used to be one of my favorites on the Four Thirds dSLRs, but now I have Micro Four Thirds, the lens is a bit big, heavy, intimidating and more crucially, the AF was very slow on the cameras prior to the Olympus OM-D E-M1 Mark II – thankfully this camera brings this superb lens back to life, although C-AF capability does not match a dedicated Micro Four Thirds lens.

I mention it here because, for those on a budget who are not needing it for fast moving subjects, it may be a great option as they may be able to pick it up at a great price second hand.

comparison

comparison

And with the zoom extended to 200mm showing how long and intimidating this lens becomes, especially when you then attach the lens hood which is a reversible design with a bayonet mount.

Close focus is comparable at 1.2m, weighs 1.07kg plus you need the FT-MFT adapter, and it uses a 67mm filter.

There is also the option of using it with a ZD 1.4x TC or a ZD 2x TC to give 400mm f/7 (equates to 800mm telephoto in full frame terms).

Panasonic Leica DG 50-200mm f/2.8-4.0:

The Panasonic 50-200mm lens is a newly released and relatively expensive lens, which I have not been able to get my hands on as yet as it is not yet in the stores.

It promises to be an awesome lens but, like the Olympus, you are losing around 1 stop of aperture compared to the 200mm f/2.8 lens.

See my earlier blog post for specs of this lens compared to its competitors.

Now for a quick almost center resolution comparison:

wide open at f/4
Panasonic 200mm f/2.8 comparison comparison
Olympus mZD 40-150mm+TC comparison
Olympus ZD 50-200mm comparison comparison

Now for a quick almost corner resolution comparison:

wide open at f/4
Panasonic 200mm f/2.8 comparison comparison
Olympus mZD 40-150mm+TC comparison

These were all taken at the same distance with a manual flash to eradicate camera shake and AF used (apologies for not decreasing flash exposure for the wide open shots, but by keeping it constant, you do get an idea of the light transmission ability of these lenses – to me, the Olympus 40-150 with TC gives marginally less light transmission).

Clearly the Olympus mZD 40-150mm with TC, whilst giving sharp images is no match for either of the other two lenses (the 200mm blows it away in the corners even at wide open f/2.8), even when these are used wide open instead of at f/4 – compare the separation of lines at the 12 marker.

With the teleconverter compared to the Olympus 300mm:

The Olympus micro ZD 300mm f/4 is an amazing lens.

When mounted on the Olympus OM-D E-M Mark II you get Dual/Sync IS and sharp handheld images are possible down to around 1/8th second at 600mm full frame field of view – now that is pretty amazing!

The Panasonic 200mm f/2.8 with 1.4x TC gives 280mm f/4 which is almost the same reach, but in my testing is not quite as sharp as the Olympus lens at f/4, but it is almost there it is splitting hairs!

The Olympus is the same weight and also has a better lens hood design (as per my discussion above), a two-stage focus limiter, and the lovely MF clutch which is often very handy. The tripod mount is designed to fit an Arca Swiss mount which is very handy for some. There is the option of using it with the 1.4x TC to further extend it – I am not sure how well the Panasonic will work with a Panasonic 2x TC to nearly match this field of view (400mm vs 420mm).

The Panasonic has several advantages of its own – it can be used at 200mm, and thus it can be taken into many sports venues which will not allow the 300mm, it focuses 20cm closer, the lens itself can still be mounted to a tripod without attaching the “external” tripod mount, and it is around 2″ shorter which makes a big difference when carrying it around or transporting it mounted to the camera:

side by side

Above a side by side comparison, note the 300mm has the tripod mount removed to reduce weight and bulk, and the lens hood is retracted.

Conclusions:

If you need 400-600mm field of view in full frame terms, and you can afford the cost of this superb lens, then it should perform better than the Olympus 40-150mm  with TC, although the Olympus 40-150mm will give you more versatility with its closer focus and zoom range and be much lighter and more affordable, while the Olympus 300mm may be a better option if you really need to get as much telephoto as you can get although the Panasonic will nearly match it when used with a TC.

When used on the latest Panasonic cameras, you also gain two very important functions not currently available with Olympus lenses on these cameras – Dual/Sync IS and DFD autofocus for moving subjects, ability to set OIS to pan mode, and of course, the aperture ring will function.

This lens is a superb optical tool with extremely well controlled levels of aberrations and lovely bokeh – when you add in that it is so compact and the fast, silent, 240fps AF system along with the capabilities of the E-M1 Mark II you have one awesome kit that is hard to beat for size or price.

Oh, and if you think that the MFT sensor is too noisy at high ISO above ISO 3200 for your type of work and so you really need that 5kg $10,000 super telephoto full frame lens, then, things will be changing very soon to address that and then there will be very few reasons to carry around heavy, expensive, bulky full frame gear:

  • sensors are being developed and indeed available on the new Sony and Panasonic cameras with dual base ISO which brings much improved high ISO performance, and,
  • AI can now produce amazing image quality from a severely under-exposed image taken at base ISO – one would expect it won’t be long before this technology is incorporated into image editing software and then into cameras as part of the “auto-ISO” system – check this out: https://petapixel.com/2018/05/09/ai-is-taking-low-light-photo-quality-to-the-next-level/
 

Choosing a super telephoto lens for Micro Four Thirds cameras

Written by Gary on May 5th, 2018

Here I will define a super telephoto lens as giving at least 300mm lens field of view on full frame cameras, which equates to at least 150mm focal length on Micro Four Thirds cameras thanks to the 2x crop factor of their sensors.

This sensor crop factor is a major advantage of Micro Four Thirds when it comes to achieving super telephoto range with a smaller, lighter lens, making this type of work more enjoyable, and much easier to hike with or carry as cabin luggage on planes when compared to full frame systems.

As is usual for my blog posts, the following links do not take you to a 3rd party online retailer but to my information wikipedia where you will find more details and links to reviews, etc.

Which lens best suits your needs will depend upon your budget and what you like to shoot.

If you are shooting moving subjects, then you need a camera that can AF on moving subjects such as the Olympus OM-D E-M1 (this has PDAF technology) or a Panasonic camera with DFD technology (most of the latest cameras from Panasonic have this). The other Olympus OM-D cameras do not have PDAF or DFD technology so you will not be able to track moving subjects well with AF locking onto them as they move.

Be aware that you may lose some features if you use a Panasonic lens on an Olympus camera or vice versa – in particular, you will not get Dual IS/Sync IS capability, and you may not be able to use auto focus stacking. If you use an Olympus lens on Panasonic cameras you will not have DFD AF and thus AF on moving subjects will not be great – this is not an issue with Panasonic lenses on the Olympus E-M1 models as they have PDAF built in which will work on any Micro Four Thirds or Four Thirds lens.

With any lens over 1kg, you may wish to invest in a vertical grip for the camera if you will be shooting a lot of portrait mode images as the lens will be causing strain on your hand otherwise.

Small birds or distant subjects = long focal length lens:

For small subjects such as birds, you will probably want a lens with 300mm focal length to give 600mm telephoto reach in full frame terms, or perhaps even a 400mm lens to get you to 800mm  reach – and ideally this should be weather sealed, have a wide aperture to allow faster shutter speeds and have a fast, accurate autofocus system.

The best lenses for this are:

  • Olympus micro ZD 300mm f/4
    •  has optical IS / Dual IS capability (on Olympus cameras only), a superb, but expensive lens, optional 1.4x teleconverter
    • unique manual focus mechanism is really handy for tripod work with difficult subjects such as astronomy
    • heavy for MFT (1270g) but light compared with full frame options
    • focus range limiter with two settings: 1.4-4m and 4m to infinity
    • lovely retractable lens hood
    • will focus as close as 1.4m which is much closer than full frame super telephoto lenses
  • Panasonic Leica DG 200mm f/2.8 with its supplied 1.4x teleconverter to give 280mm f/4
    •  superb, very expensive lens, optical IS (can sync with IBIS on Panasonic cameras but not with Olympus cameras)
    • heavy for MFT (1245g) but light compared with full frame options
    • 2″ shorter than the Olympus 300mm makes it more portable although just as heavy
    • focus range limiter with one setting – 3m to infinity
    • lens hood is an awkward slip on and tighten style hood
    • will focus as close as 1.15m which is much closer than full frame super telephoto lenses
    • is shorter than the Olympus lens and can be used in major sports events, while the 1 stop faster aperture allows lower ISO to be used if you don’t need the teleconverter to get closer to your subject, making it a more versatile lens than the Olympus 300mm
    • OIS may not be as good as the Olympus 300mm – further testing required
    • when used with teleconverter, image quality is almost as good as the Olympus 300mm lens and the Olympus 300mm gets you a touch closer to the subject
    • aperture ring (but does not function on Olympus cameras – you need to use the camera controls as is usual on all cameras)
  • Panasonic Leica DG 100-400mm f/4-6.3 lens
    • more affordable, lighter (985g) but smaller aperture and lower image quality may impact on what you want to achieve
    • focus range limiter with one setting – 5m to infinity
    • similar length as the Pan. 200mm f/2.8 but it extends outwards on zooming

If you are on a budget, then consider the Olympus m.ZD 75-300mm f/4.8-6.7 II zoom lens or Panasonic Lumix G Vario 100-300mm f/4-5.6 Mega OIS lens however, image quality will not be as good and the aperture limitations will require higher ISO levels to compensate.

An alternative for those who cannot afford the premium lenses but who own an Olympus OM-D E-M1 with its PDAF technology, is to buy a second hand used legacy Four Thirds lens – the Olympus ZD 50-200mm f/2.8-3.5 with a teleconverter (and a FT-MFT adapter) – the AF will not be as fast as with the Micro Four Thirds lenses but image quality is excellent and it is weathersealed.

Outdoor arena sports events = 200mm lens:

Unless you are a certified photographer for the event, you will probably not be allowed in the event (eg. AFL football or Australian Open tennis) with a lens with a focal length greater than 200mm, and even then you are not licensed to publish or sell any images!

Note that some venues do allow lenses up to 300mm (eg. AAMI Park), and for these you could choose a lens as per the previous section.

This makes the Panasonic Leica DG 200mm f/2.8 with its supplied 1.4x teleconverter the BEST option by far of ANY system, but it is expensive and you cannot zoom out.

More affordable alternatives with zoom options but 1 stop less aperture are:

The kid’s soccer game:

Here you can usually get to stand at the fence within 5m of the pitch near the goal.

This gives you challenges as, for play near you, you may want a 100mm focal length, while play in the closest half of the pitch you need 200mm, play around the center and closest part of the further half, 300mm focal length, and for play around the goals at the opposite end, perhaps 400mm. (Note these focal lengths are for Micro Four Thirds, for full frame cameras you need to double these).

Imagine you are shooting a 10 yr old playing soccer with a 200mm lens on Micro Four Thirds (400mm on full frame). At 12m, you will get a half body shot in portrait mode. At 15m distance, you will get a great 3/4 length body shot when shot in portrait mode. At 25m distance you get the perfect full body action shot in portrait mode. At 50m, you can get a landscape shot of a group of players, but you may wish to crop it further.

For parents on a budget or wish to remain discrete, a Olympus m.ZD 75-300mm f/4.8-6.7 II zoom lens or Panasonic Lumix G Vario 100-300mm f/4-5.6 Mega OIS lens or if you really want more zoom and image quality, the Panasonic Leica DG 100-400mm f/4-6.3 lens may be ideal, but the slow aperture may be challenging when the light gets dim.

Perhaps a better choice for those with more budget would be the Panasonic Leica DG 50-200mm f/2.8-4.0 lens and accept that you will just have to either forego the far end play or crop it a lot, but the wider aperture will be more forgiving in low light and will provide better background blurring. I would also expect image quality will be better but we will have to await reviews.

Of course, the Panasonic Leica DG 200mm f/2.8 with its supplied 1.4x teleconverter will cover most of your needs (and you may need to have another camera ready with a short telephoto for close play) but this may be overkill at $AU4299! Then again, your kids are only young once!

The full frame perspective:

For those wishing to compare full frame camera system alternatives, here is a short list of Canon lenses:

Canon EF 400mm f/5.6 lens:

  • no image stabilisation at all
  • old optical design and 8 straight blades instead on 9 rounded blades
  • not fully weathersealed
  • much longer than the MFT options at 257mm
  • close focus only to 3.5m!
  • 1.25kg and $US1249 making it at least relatively light and affordable but the f/5.6 aperture means any advantage of using full frame over MFT with a 200mm f/2.8 is nullified.

Canon EF 100-400mm f/4.5-5.6L IS II:

  • a more modern design than the 400mm f/5.6 but still the f/5.6 aperture means any advantage of using full frame over MFT with a 200mm f/2.8 is nullified.
  • heavier at 1.64kg, improved weathersealing but still not as good as the MFT options
  • 193mm long but extends on zooming
  • close focus to 1m
  • $US2199
  • Sony has a similar lens, the Sony FE 100-400mm f/4.5-5.6 GM OSS lens but this will set you back $US2499

Canon EF 400mm f/4 DO IS II:

  • a unique diffraction optics (DO) optical design allowing a much more compact lens but characteristic DO aberrations
  • requires 52mm rear drop in filters
  • close focus only to 3.3m
  • 233mm long
  • 2.1kg
  • ~$A9000

Canon EF 600mm f/4 does give significant low light advantages over the Olympus 300mm f/4 but at 4kg it is not fun to carry and use, and at $US11,500 it is incredibly expensive and its close focus is 4.5m – it is a totally different beast altogether!

And, to cover the zoom range needed for a kid’s soccer game of 200-600mm full frame range, you might need to go for:

  • Canon EF 200-400mm f/4 L IS USM EXT lens
    • this has a built-in 1.4x teleconverter which can switch it to a 280-560mm f/5.6 lens, very neat and a great lens but this will set you back $US11,800 and break your back at 3.6kg! It still doesn’t get you to 800mm for the far end shots.
  • “Sigmonster” – Sigma 300-800mm f/5.6 lens
    • 6kg monster of a lens over half a meter long and will cost you around $US6000 and it won’t focus closer than 6m!
  • Sigma 150-500mm f/5-6.3 lens
    • perhaps a more sensible lens for most, but still weighs 1.9kg and won’t get you the telephoto reach for the far end of the pitch
  • Tamron 150-600mm f/5-6.3 lens
    • now we are talking, more reach than the Sigma but still sensibly sized and weighing 1.9kg, and is only $US1299


Background blurring test – Sigma 35mm f/1.4 on Sony a7II full frame vs Panasonic 20mm f/1.7 pancake on Micro Four Thirds

Written by Gary on March 25th, 2018

One of the main reasons many photographers prefer to use a big, heavy, expensive full frame system instead of a fun, lighter Micro Four Thirds system is that you can gain a greater degree of background blurring in certain situations which is just not possible with the smaller sensor of Micro Four Thirds.

For macro work and for telephotos, this is not really an issue as you get plenty of background blurring with both systems.

BUT, it is with wide angle lenses that full frame systems with their f/1.4 pro lenses should create a substantial difference – BUT how significant is this difference?

If your subject distance is more than 3m away, and you are using a 35mm lens on a full frame, then the degree of background blurring at each aperture from f/1.4 through to f/5.6 really does not change that much, so you will not see a massive difference between full frame and Micro Four Thirds at this field of view.

The closer the subject is, the greater the difference is possible IF you are shooting the 35mm full frame at f/1.4 vs a Micro Four Thirds 17mm f/1.2 lens (which gives a similar image to the full frame system as if you are shooting the full frame 35mm at f/2.4).

Now, I don’t have the beautiful, optically superb, Olympus micro ZD 17mm f/1.2 PRO lens to compare, so you will have to assume in the comparisons, it will look like the 35mm f/2.5 images.

I do have the lovely super compact, very sharp Panasonic 20mm f/1.7 pancake lens (original version) on my Olympus OM-D E-M1 Mark I to test for this comparison, and it should come in with similar imagery as the massive, heavy Sigma 35mm f/1.4 lens when shot at f/3.5 (there is a slightly narrower field of view with the Panasonic lens – my apologies, but that should not take much away from this lesson) and the 1st two images are to demonstrate this, both focused on the leaves to the right perhaps where you would normally place your subject, but what I want you to carefully observe is the amount of blurring of the background in each of the images so you can decide if buying a big, heavy, expensive system is worth it for you:

These have all been taken as RAW files, opened in Lightroom 6, minor adjustment in exposure to make them roughly similar, auto white balance, and Adobe default camera profile used, the images were then resized for the web.

As usual, the links on this page take you to my wikipedia which gives more information – and NOT to a 3rd party online reseller.

Panasonic 20mm at f/1.7

Above is the Panasonic 20mm f/1/7 at f/1.7.

Sigma 35mm at f/3.5

Above is the Sigma 35mm f/1.4 ART lens at f/3.5 on a Sony A7II full frame mirrorless camera to give a similar depth of field as the Panasonic wide open.
Sigma 35mm at f/2.5

Above is the Sigma 35mm f/1.4 ART lens at f/2.5 to give a similar depth of field as the Olympus 17mm f/1.2 lens wide open.

Sigma 35mm at f/1.4

Above is the Sigma 35mm f/1.4 ART lens at f/1.4 to show the absolute maximum degree of background blurring this lens can achieve with a subject at this distance – is that enough to make you want this system or would it not make or break your image if you used the Olympus 17mm f/1.2 lens instead?

Sigma 35mm at f/5.6

Lastly, above is the Sigma 35mm f/1.4 ART lens at f/5.6 to give a similar depth of field as the Olympus 12-40mm f/2.8 lens at 17mm f/2.8 – an f/2.8 Micro Four Thirds wide angle lens is certainly not going to give you much background blurring unless the subject is much closer.

A couple of other notes to make with this test shoot:

  • despite the Panasonic lens being a 1st generation Micro Four Thirds lens with a “slow AF system”, the Panasonic 20mm was MUCH faster and more reliable at gaining AF on leaves moving a little in the wind than the Sigma lens, while the Sigma lens often hunted and sometimes would inexplicably lock focus on the background – it certainly was not fun and I couldn’t really trust it! HOWEVER, as I don’t have the Sigma USB Dock I can’t check if the lens has the latest firmware and seems it cannot be updated via the MC-11 adapter which has a USB connector for its own upgrade.
  • The Sigma lens also kept open and closing the aperture while I was trying to compose and lock focus which made the EVF experience quite poor – this is probably a lens firmware – have just ordered the Sigma USB Dock to update the firmware.
  • The Sigma lens was too big and heavy for the Sony a7II – it did not feel balanced and was very tiring to hold.
  • Unlike the Olympus 17mm f/1.2 lens, the Sigma lens is not weathersealed.

When used with a smaller Micro Four Thirds cameras such as the Olympus E-M5 II, one could put the Panasonic lens and camera in a jacket pocket quite easily – there is no chance you can do this with the full frame kit which will also be more that twice the weight.

The Sigma 35mm f/1.4 shooting at around 4m subject distance:

Sigma 35mm at f/1.4

Above is the Sigma 35mm f/1.4 ART lens at f/1.4

Both of these are essentially straight from the camera with the Sony a7II focused on the lovely Eucalyptus “gum” tree.

Sigma 35mm at f/5.6

Above is the Sigma 35mm f/1.4 ART lens at f/5.6 – the difference in background blurring is now quite subtle despite the lens being stopped way down to f/5.6, although the foreground blurring is more noticeable!

Moral of the story:

If you want to blur backgrounds either:

  • use a standard or telephoto lens with a relative wide aperture and stand further away to get the subject in frame,
  • use a wide angle lens with a wide aperture BUT have the subject closer than 2m – the closer the better for a blurred background
  • use software to add a Gaussian blur to the background – just as the smartphone companies are now doing in the latest iPhones.

Maybe full frame advantage is not all it is cracked up to be if your subject is more than 2m away!

I am not convinced the fairly minor increase in background blurring with the 35mm f/1.4 lens at f/1.4 at this subject distance would make a difference to my image in most situations – whether such an image succeeds or not will be far more dependent upon other factors such as subject, composition, lighting, etc.

Who should consider buying the Sigma 35mm f/1.4 ART lens?

Those with full frame cameras who primarily need it for either:

  • astrophotography (although it’s field of view is rather limiting unless you are doing panoramic stitches), or,
  • close up portraiture/fashion work with subject closer than 2m to provide a nice environmental style portrait – but you may want the Sony a7III, Sony a7RIII or Sony a9 to improve the AF speed.

Landscape, street or travel photographers do NOT need the bulk and weight of this lens to achieve their needs, a much smaller, lighter 35mm f/2.8 lens or a Micro Four Thirds option should suffice as most of the time you will be shooting at f/8-f/11 for adequate depth of field on a full frame camera in these scenarios (f/4-5.6 in Micro Four Thirds).

Post script:

The Sigma lens firmware was v1.4, I have now updated it to v2.0 via the Sigma USB Dock but still the AF-S focus locking is significantly slower than the Olympus – Panasonic combination and the Eye AF functionality works (in AF-S mode only with the Sony a7II) and has similar speed as the Eye AF on the Olympus but you need to press a button to activate it each time on the Sony – it is not automatic as on the Olympus cameras.


What have we done? Where have all the insects gone? Is this the beginning of the end?

Written by Gary on March 24th, 2018

I live in southern parts of Australia, and if you live here or traveled here in summer – you will only be too aware that our environment is filled with insects, so numerous that they are often very annoying – particularly when it comes to our famous bush flies which do what they can to get to the tears of our eyes to get enough protein so they can produce eggs, and to our mosquitoes – although thankfully down here away from the tropics they do not spread malaria or dengue fever.

Nearly all houses have insect screens to allow the evening summer breezes to cool them while keeping the mosquitoes out.

And, we would hardly ever think of going to a BBQ, picnic, hiking trip, or a camping trip without taking a personal insect repellent spray, or burn some insect repellent nearby.

If you are driving home on country roads at night in spring or summer, you can generally guarantee your windscreen and front of car will have thousands of dead bugs caked on by the end of your trip.

In fact, the bush flies are so annoying in summer, I try to do all my outside activities before December and after March as much as possible.

It was only March 2016, when we had a plague of mosquitoes in Melbourne.

This is what has characterized my experience with insects for all of my life. Sure, some years are “worse” for flies that other years – but you could always guarantee they will be there as soon as the sun comes up and worse when the humidity rose.

BUT THIS SUMMER AND AUTUMN IS DIFFERENT – THERE ARE ALMOST NO FLYING INSECTS NEARBY!

I have a cat, and cats like to go outdoors at night whenever it takes their fancy and then come in, and as anyone who has had a cat without a cat door will know, this necessitates getting up dozens of times every night to let her out and let her in. Now my cat doesn’t go prowling as I have built structures to keep her contained – so, yes environmentalists, cats are bad for our native species, but I keep mine under control – after all she is a Russian Blue and I can’t afford to have her roaming.

For the whole of this spring, summer and even now into autumn, I have been able to leave the door open all evening until midnight each night – with the lights on in the house, no insect repellents or screens.

I have yet to be bitten by a mosquito and the total numbers of insects around the lights inside the house I would be lucky to count on one hand at the end of the night – not much fun for my huntsman spider!

I have been going for evening walks down to my local national park where there is a river in a valley and I have walked at dusk, well after sunset along the river wearing shorts and tee shirt – no insect repellent – still not bothered by even one mosquito!

I do a lot of nature walks looking for photographic opportunities and normally wear wrap around sunglasses to keep the flies away from my eyes – this year, hardly a fly has bothered to annoy me.

So far it seems the Australian bull ants in the national park have not been affected – but perhaps most of the other species have and perhaps the beautiful birds there, the blue wrens and their friends will soon run out of their food supply and struggle to survive.

Is it just me getting old and I can’t see them anymore and can’t feel them? Whatever, it is, my empirical observations are certainly not scientifically robust enough to cause alarm in themselves.

However, it does seem that we are in the midst of a massive long term decline in insect numbers globally – and its not just the bees!

THE GLOBAL DECLINE IN INSECTS

We have heard in the media reports of world wide bee deaths over the past few years, but the reports of the general massive decline and presumably mass extinctions of many species of insects worldwide have not really been prominent.

In 2012, A major survey of threats to insect life by the Zoological Society of London, published in 2012, concluded that many insect populations worldwide are in severe decline, limiting food supplies for larger animals and affecting ecosystem services like pollination. In Europe and the United States, researchers have documented declines in wild and managed bee populations of 30 to 40 percent and more due to so-called colony collapse disorder. Other insect species, such as the monarch butterfly, also have experienced sharp declines.

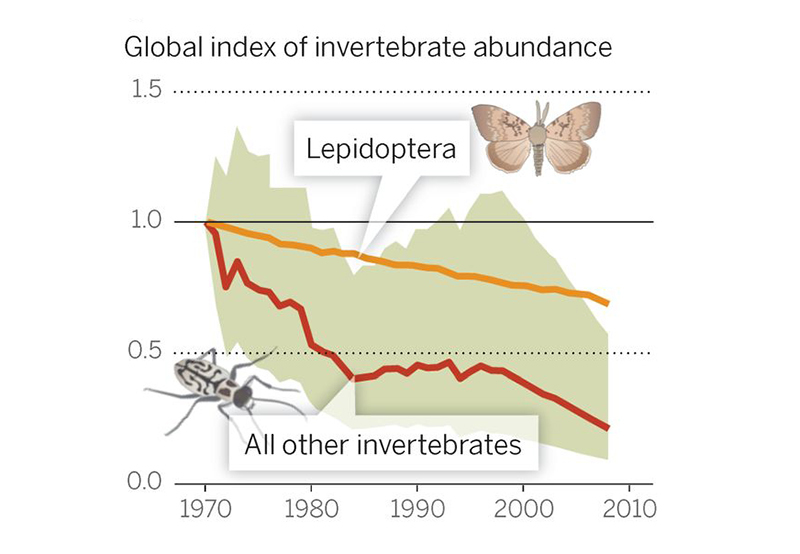
decline

In 2014, a German study showed average summer biomass of insects in a German nature reserve regions has steadily decreased from 1.6 kilograms (3.5 pounds) per trap in 1989 to just 300 grams (10.6 ounces) in 2014!

The Guardian Oct 2017 report on the German study.

A report on ScienceMag.org in May 2017 commenting on “Where are all the insects gone?”

This photographer reported dramatic decline in his experience in US.

This year entomologists in Australia have raised concerns of a dramatic drop in insect numbers in many parts of Australia including Sydney.

The Australian published concerns last week and published this quote:

“Dave Goulson, professor of biology at Sussex University, says: “Insects make up about two-thirds of all life on Earth but there’s been some kind of horrific decline… We appear to be making vast tracts of land inhospitable to most forms of life, and are currently on course for ecological Armageddon. If we lose the insects, then everything is going to collapse.”

Perhaps the end of the world won’t be marked by a bang, but by silence. A long exhalation. A slide into quiet.”

Listen to a podcast on ABC radio here, broadcast this week!

Should we worry?

Hell no, how awesome would it be to enjoy outdoor summer activities without those annoying pests!

Of course we don’t need to worry, we still have Facebook, cosmetics, selfie-sticks and there is always new exciting tech things to come out such as those google home things that can automatically control your house and take your insect screens down because you won’t be needing them anymore.

And thankfully, now the insect diet option is out, most of us would be happy not having to fry crickets and grass hoppers for a feed. Remember, insects were meant to be our saving grace to provide our main source of protein in the next 50 years as the human population reaches its peak and food supplies, in particular, protein supplies, become increasingly scarce and unable to feed the multitudes.

Seriously though, humans need biodiversity and a food chain.

Insects are a key part of our ecology:

  • 70% of all animal species are insects
  • many insects pollinate our plants (sorry vegetarians, you won’t be getting your veges, and sorry, for those who like meat, because most of our meat sources eat grains and grasses, so eventually, these sources will be affected too) Some 80% of wild plants rely on insects for pollination;
  • many insects control the numbers of other insects so we have less potential for plagues
  • many insects have the critical role of breaking down our wastes so they can be returned to the soil faster
  • 60% of birds rely on insects as a food source
  • many fish rely on insects as a food source
  • amphibians rely on insects as a food source – loss of amphibians will result in increased algae-infested waters and reduced food for fish
  • so most of the animal world’s survival and flowering plant’s survival is dependent upon a plentiful biodiversity of insects
  • humans may yet come to rely on insects as a food source

But surely it is just a temporary blip in numbers and all will be well?

This all depends upon the causes but the charts from the Germans seem to suggest a long trend down towards extinction a persistent 75% decline over a quarter of a century is no laughing matter!

What has caused the insect decline?

Most flying insects have very short adult flying life spans – often only a week or two, or even shorter, although female mosquitoes live around two months – their numbers are thus totally dependent upon their ability to reproduce – perhaps this is a clue as to why it seems the bull ants are not affected (yet) – they have a much longer life span of around 1 to 2 years.

Entomologists have yet to pinpoint one specific cause but it seems a number of possibilities exist:

1. Insecticides – in particular, neonicotinoids

  • these are water soluble and often used to coat seeds which then may wash off onto the ground and into streams after rains, or can be blown off in windy conditions and contaminate other flowers such as nearby canola fields, or are taken up in vacuoles by the plant and expressed in flowers and leaves killing pollinators and insects which suck on the plant, and then also when the flowers fall onto the ground – the insects which eat the fallen flowers
  • at the seedling stage, canola crops are vulnerable to red legged earth mite and a number of similar or related pests such as blue oat mite and lucerne flea, hence many farmers resort to “an insecticide seed dressing” – the amount of insecticide coating one seed apparently could kill 80,000 bees!
  • In Victoria, a canola crop is usually sown in late autumn or early winter into moist soil and the seeds covered with a light amount of soil – heavy rains soon after sowing may theoretically wash some insecticide into streams, while the canola flowers in September just in time for pollinating insects to be at their peak numbers and potential for further toxin damage
  • these take about a month to break down in sunlight, but can take several years if there is no sunlight as in heavy soil
  • unfortunately, they have not been banned as yet in Australian agriculture, although have been banned in other countries, and I note the recent increase in canola fields in the regions which provide run off to my national park stream – could there be a direct link?

2. Changing climatic and seasonal patterns which disrupt their life cycle

  • rapid switches of extremes of weather can play havoc with insect life cycles

3. Fly swats – only kidding these are NOT the cause – who owns these nowadays anyway?

4. Insect infections such as viruses

5. Loss of habitat

5. Air pollution

see more on wikipedia.

and the future? what future?

And, in the words of the Moody Blues …. To Our Children’s Children, Children …… I am sorry, we may have failed you in more ways than just vertebrate extinctions (oh yes, this week the last male white rhino died – unless that was fake news – but I haven’t seen any of those around here so maybe its real), global pollution, resource exhaustion, inter-generational debt, climate change, a return to the pre-antibiotic era of no chemotherapy, no transplants and much reduced surgical options, perhaps nuclear war, and perhaps now have contributed to a critical extinction process of the insect world.

Genesis 1:27:

Then God said, “Let Us make man in Our image, according to Our likeness; and let them rule over the fish of the sea and over the birds of the sky and over the cattle and over all the earth, and over every creeping thing that creeps on the earth.” God created man in His own image, in the image of God He created him; male and female He created them. God blessed them; and God said to them, “Be fruitful and multiply, and fill the earth, and subdue it; and rule over the fish of the sea and over the birds of the sky and over every living thing that moves on the earth.”

Luckily we were not made in the image of Aries or Satan – because then the creatures of the earth would be in real trouble!

We almost created this scenario back in the 1950’s with DDT, prompting Rachel Carson to write her famous provocative book The Silent Spring which helped cease usage of the lethal toxin – but it seems we have not thought things through very well and our Seven Deadly Sins as led us to our future – you reap what you sow – and perhaps soon there will be no point even sowing because there may not be any seeds produced.
silent spring

Insects evolved over 450 million years ago during the Devonian period when forests started to spread across the earth, and they have survived every major extinction event since then – but they perhaps have met their match with humanity, although as a group, they are diverse enough to survive even our mismanagement. It is likely, that as the earth becomes inhospitable to most life forms, new extremely hardy, insecticide and radiation resistant life forms will evolve to replace them.

Biology 101 on species population growth cycles does predict global human population will soon peak and then start to die off from around 2040 or so when resources start to become scarce, particularly in the severely over-populated regions. But will this “adjustment” to the human footprint come too late to save planet Earth from ending up like Mars but with radioactive, toxic oceans?

Could there be a common explanation for why human fertility has fallen as well? A controversial French study suggested male fertility is apparently falling by 2% per annum and sperm quality has fallen by 50% in just 18 years from 1977 to 1995 . A meta-analysis of 61 papers published in the BMJ in 1992 suggested that sperm counts had fallen by half in the preceding 50 years. In another French study, sperm counts fell by 32% between 1989 and 2005 while the proportion of properly formed sperm fell from 61% to 53%. See The Economist report.

Time to forget reality TV and GET REAL!

Hopefully nature will fight back – but it will need our help!

Australian native long legged fly

This dainty little metallic blue and green Australian fly is the long legged fly (Austrosciapus connexus) – which is mainly found along the east coast of Australia, Adelaide and Perth but not in southern Victoria or Tasmania. I took this shot in the Sydney Botanical Gardens hand held with Olympus mZD 60mm f/2.8 macro lens.


The new Sony a7III compared to the Sony a7RIII and Sony a9

Written by Gary on March 2nd, 2018

Sony has just announced a brilliant new full frame mirrorless camera – the Sony a7III which is a massive upgrade to the earlier a7II model and is a cross between a budget-level version of the Sony a9 and the high resolution Sony a7RIII, both of which are much more expensive.

All of these cameras are roughly the same size and weight (around 670g) and all are partly weathersealed – recent tests show the a7RIII is not sealed on the bottom so don’t let water pool under it!

All of these have a 5 axis sensor based image stabilisation system, although this has been significantly improved in the newer models.

All have the same flash sync of 1/250th sec and the proprietary modernised Sony flash hotshoe.

The feature set of the new Sony a7III make it almost perfect for wedding photographers as it gives sufficient image quality, the full frame shallow depth of field capabilities, class leading Eye AF capability and AF region coverage (far better than any dSLR), and very good high ISO performance, while the addition of the 2nd SD card slot provides professionals with their much desired image backup system in case of card failure, and very good video performance.

Compared to the Sony a7RIII, the a7II is much more affordable, has better AF coverage, slightly better burst performance but the compromise is 24mp instead of 42mp, a lower resolution EVF, and no pixel shift mode.


It is likely they will all suffer the same star eating noise reduction issues, so Milky Way fans need to assess this issue.

As usual, the links below take you to my wikipedia pages where you can get more information and links.

Quick comparison of Sony cameras:

Sony a7II Sony a7III Sony a7RIII Sony a9
Price $AU1795 $US1999 / $AU2999 $US3499 / $AU4899 $US4500 / $AU6745
Sensor 24mp 24mp 42mp 24mp
dynamic range ISO 100  13.9EV  13.8EV (12.4EV uncompressed RAW in burst mode – 12bit)  14EV  12.6EV
dynamic range ISO 640  11.8EV  13.4EV due to dual gain design  13.1EV due to dual gain design  12.4EV
AF 25CDAF, 117PDAF (all clustered in central area), some EyeAF, AF only half as fast as the others and C-AF is problematic 425CDAF, 693PDAF, 93% coverage, superb EyeAF in C-AF 425CDAF, 399PDAF, 68% coverage, great EyeAF in C-AF 425CDAF, 693PDAF, 93% coverage, superb EyeAF in C-AF
comments older battery, poor battery life; no 4K video; 1080HD only to 60p 50Mbps; only USB 2.0 not USB-C; IBIS not as good; no electronic silent mode; high ISO not as good; LCD screen not touch sensitive; EVF not as good; only one SD card slot; older styling and menu system; joystick; AF in magnified focus mode; touch AF; AF-On button; 2.3mdot EVF; USB-C 3.1; red night mode; Pixel shift mode; 3.7mdot EVF; 4K video; 1080HD 120p 100mbps; USB 3.1; touch screen only selects AF point; 3.7mdot EVF; best sports functions; joystick; 4K video; 1080HD 120p 100mbps; AF-On button; “AF Area Registration”, dynamic range not as good as a7RII;

It would appear this is a fantastic upgrade to the Sony a7II and at that price point with its feature set should be a very popular camera indeed and should cover most needs.

It beats the Micro Four Thirds cameras such as the Olympus OM-D E-M1 Mark II and the Panasonic G9 on some features (Eye AF, AF coverage, full frame IQ and shallow DOF capability, and EVF), but the Micro Four Thirds cameras beat it in terms of burst rate (the Olympus can get to 18fps and even 60fps), feature set (eg. Pro Capture mode, HiRes mode, Live Composite, etc) , image stabilisation, swivel screen, and most importantly, weight, size and price of the lenses.

A quick comparison of Sony lenses vs Micro Four Thirds lenses:

Sony FE 24-105mm f/4G OSS:

  • this is $AU2029 and weighs 663g, uses a large 77mm filter
  • the Olympus 12-40mm f/2.8 doesn’t give as much reach and loses 1EV in shallow DOF but comes in at $AU798, uses 62mm filters and weighs almost half as much at 382g

Sony FE 12-24mm f/4 G:

  • this is $AU2598 and weighs 565g
  • the Olympus 7-14mm f/2.8 comes in at $AU1394, and weighs slightly less

Sony FE PZ 28-135mm F/4 G OSS

  • this is $AU3068 and weighs 1215g, but to be fair, it is built as a Cine lens
  • the Olympus 12-100mm f/4 OIS is $AU1540 and is 561g and gives much more reach of 200mm in full frame terms, making it a great travel lens, but loses 2EV of shallow DOF capability, however, at half the weight and price this may not be a bad compromise for most people who can resort to prime lenses for shallower DOF if needed.

Sony FE 100-400mm f/4.5-5.6 GM OSS lens

  • this is $AU3648, weighs 1395g
  • the Olympus 40-150mm f/2.8 is less than half the price and weight but only gets to 300mm not 400mm
  • the Panasonic 50-200mm f/2.8-4.0 OIS is less than half the price and weight

Sony FE 85mm f/1.4 G

  • this is $AU2799 and weighs 820g, and is perhaps the most important lens to match with the a7III’s Eye AF capability
  • the Olympus 45mm f/1.2 is $AU1588 and weighs half as much at 410g but you do lose 1.5EV in shallow DOF capability, although, for most situations, the shallow DOF of the Olympus lens suffices and is perfect for head and shoulder portraits. Whilst the Sony has the better tracking of subject’s eye, the Olympus is probably better at selecting the all important closest eye.

And there is nothing yet to match the Olympus 300mm f/4 with its 600mm full frame reach, although Sony appears to be working on a lens with that reach, but one can expect it will be 2-4x more expensive and much heavier than the Olympus lens.

If you need the features of Sony full frame and you don’t mind the weight, size and at least twice the cost of the lenses, then the Sony 7III may be the camera for you, but for most people, the Micro Four Thirds solution will be the better, more enjoyable option.