This week I took some time off to explore Victoria’s Alpine region in Winter and took my Panasonic GH-1, Olympus E-510 and Canon 1DMIII.
After the first very steep hill climb on which I thought I was going to have a heart attack (reminder to self – time to get a bit fitter!) carrying the Canon 1DMIII and a couple lenses as well as the Panasonic GH-1, I quickly decided that unless I was going to be shooting something that specifically required the big, heavy 1DMIII and its lenses, this kit was going to stay in the car!
The image quality and resolution of the Olympus E510 and Panasonic GH-1 are very similar at low ISO to the Canon 1DMIII, and I could easily cover the focal length range without it, while shallow depth of field and close up work could be achieved very satisfactorily with the E510 with ZD 50-200mm f/2.8-3.5 lens.
Thus my hiking kit quickly became reduced to 2 cameras each with only 1 lens giving me 28-400mm coverage in 35mm terms:
- Panasonic GH-1 with its 14-140mm HD lens – this would give me 28-280mm coverage (although best at 28-100mm), image stabilised with useful ISO to 1600 (3200 at a push), and with HD video with AF if I needed it, but perhaps best of all, the ability to alter image aspect ratio according to scene without losing pixels (thanks to its over-sized sensor)!
- Olympus E510 (the E620 or E30 would be better but I don’t have them) with ZD 50-200mm f/2.8-3.5 lens – a great image stabilised combo with ISO useful to 400 (maybe 800 at times), but giving great focal length reach of 100-400mm with wide aperture allowing shallow depth of field and ability to compress landscapes, capture wildlife and even do close up work to 1:2 macro if needed.
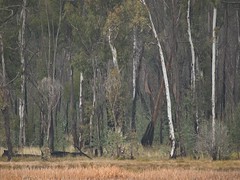
An example of the E510 with 50-200mm SWD lens – uncropped image of bushfire-affected Australian alpine forest taken across a lake in light fog conditions (cloud actually as it was only 5deg C at this altitude – which required wearing gloves) at 200mm focal length (400mm in 35mm terms).
This image shows the contrast of the white Candlebark gum trunks against the fire-scarred black trunks from the 2003 bushfire which ravaged the region 6 years ago.
Click on image for larger view.
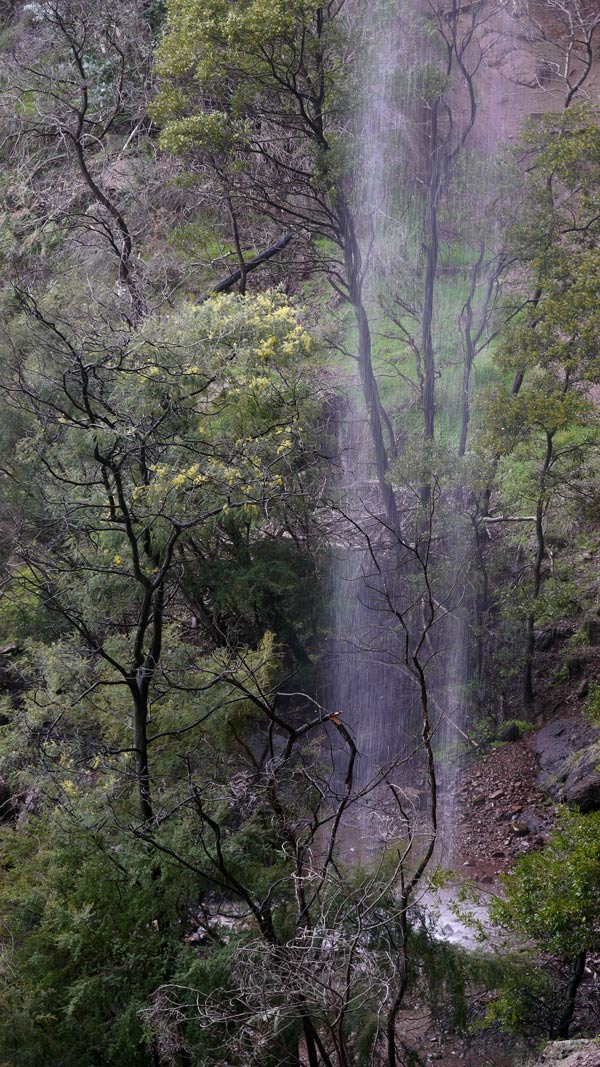
And, to demonstrate the 16:9 image aspect ratio of the Panasonic GH-1, here is the Paradise Falls, uncropped but resized for the web:
Finally, another GH-1 photo – 6 years on – not all parts of the forest show evidence of new growth – some were so devastated, they will take years to recover.
Again click on image for larger view.
It goes to show, the best camera is the one you are willing to take with you and actually bring – size does matter – and the Micro Four Thirdsand Four Thirds cameras and their beautiful lenses definitely have a big role to play.
A few quick comparisons:
- Panasonic GH-1 with 14-140mm OIS HD lens giving 26-280mm coverage (10% more width in 16:9 aspect ratio) + 28-560mm HD video coverage with AF = 904g
- Canon 1DMIII + 24-105mm ISL lens giving 31-137mm coverage but only in 3:2 ratio and no video = ~1.8kg
- Olympus E510 with ZD 50-200mm f/2.8-3.5 SWD lens gives 100-400mm coverage with IS with close focus to 1.2m for nature macros = ~1.5kg, will work very well with a 1.4x or 2x tele-extender in AF, and the lens can also be used in MF mode on the GH-1 for extended focal length HD video or 16:9 aspect ratio
- Canon 1DMIII with EF 70-200mm f/2.8 IS L lens gives 91-260mm coverage = ~2.9kg
Here is another photographer who has create some great alpine shots using a GH-1 – check them out!







hi ya my names roger i love your blog i have just got the GH1 i live in WA.i was wondering how you get the 28-560 mm in video? i have read the manual i was under the impression that cant use extra optical zoon in video mode? can you help me regards roger
Hi Roger, that’s an easy one.
In the movie menu, scroll down to digital zoom and select 2x (don’t bother with the 4x – that’s a bit ugly).
As the sensor is 12 megapixels, the 2x digital zoom just uses the central 3 megapixels which is plenty enough to cover the 1-2megapixels of HD video without loosing image quality.
Thus 2x digital zoom can give a 35mm focal length reach of ~560mm when using the 14-140mm lens.
Remember to turn off the 2x digital zoom for still images as there is no point – you can just crop in Photoshop or use the “optical zoom” function for still which does the cropping for you.
thankyou very much for that your a legend,may i ask what software would you recomend for editeing the AVCHD files? i have a panasonic bluray player with 500GB hard drive and would like to edit the AVCHD footage and play it on my BLURAY player after saveing it to the hard drive
regards roger
I have only just started editing videos, thus am far from an expert.
On my Win Vista system I have used Ulead Video Studio 11 Plus which has a BluRay disc burning option but I have not used that – the DVD burn option which I have used does seem to have a few bugs but works.
I have decided to stick with 720p as the 1080i gave not so nice results at my daughter’s cello concert on the weekend due to motion artefacts. Of course 1080i will be fine if your subject is not changing too quick and you pan very slowly.